.svg)
.svg)
Do I Need a Permit for a Backyard Shed?
.svg)
.svg)

Adding a backyard shed can transform your storage and outdoor space, but before you start building you need to know whether a permit is required. Permit requirements hinge on factors like shed size and height, property setbacks and zoning, and HOA rules, along with the drawings, photos, fees, inspections, and timelines that local jurisdictions.
For product-specific permitting documents, visit our permits page and search for the Best Barns product you are planning to build.
Understanding Permit Triggers for Backyard Sheds
Permits for backyard sheds depend on more than square footage. Size, height, foundation, utilities, and where you place the structure all influence whether your city requires review. Use this quick guide to understand the most common triggers before you build.
Common Triggers That Require a Permit
Start by measuring your planned shed and noting how you’ll use it. Then compare each factor below to your local rules to determine if a permit applies.
- Footprint: Many areas exempt small sheds (often 120–200 sq. ft.), while larger footprints require permits. Always verify the exact threshold for your location.
- Height: Taller sheds—such as ridge heights over 10–12 ft or higher wall plates—often trigger review to confirm structural stability and zoning limits.
- Foundation type: Permanent foundations (slab, frost-depth piers, or stem walls) typically require permitting; portable, skid-mounted bases may not.
- Utilities: Adding electrical, plumbing, or HVAC usually requires separate permits and inspections, even if the shed’s size is exempt.
- Use and occupancy: Converting a shed into a studio, office, or conditioned space can change its classification and trigger additional code requirements.
- Location on the lot: Placing the shed within setbacks, near property lines, over easements, or in flood, coastal, or wildfire zones commonly requires permits or special approvals.
- Doors, windows, and loads: Large openings, heavy doors, lofts, and high snow or wind loads may require engineered details and a permit for safety.
- Historic or design districts: Overlay zones often require design review and permits regardless of shed size.
For many homeowners, choosing a design that stays within local “no-permit” thresholds can save time and cost while still delivering the storage you need. If needed, we’ll help you tailor a Best Barns kit to meet your local criteria and keep your project on track.
How to Verify Local Permit Requirements and Timelines

Verifying shed permit requirements is simpler than it looks. Start online, confirm details in your permit portal, then make a quick call to the building desk. You will verify size and height limits, setbacks, HOA rules, documents to submit, fees, and timelines in minutes.
Check Your City or County Website
Go to your city or county building department page and search for accessory structure or residential shed. Look for pages that outline size and height thresholds, zoning setbacks from property lines, and when a permit is required. If you live in an unincorporated area, the county is usually the authority. Use search terms like shed permit, accessory building, zoning setbacks, and residential permits. A quick directory to local government sites can help you find the right office: Find Local Government Websites.
Use the Permit Portal to Confirm Details
Most jurisdictions host a permit portal or PDF guide that lists submittal requirements. Review the permit type (building, zoning, or both), submittal checklist, fee schedule, inspection stages, and typical processing times. Save any PDFs and note the permit type name. If your portal provides a fee estimator, input your shed size and foundation type to preview costs.
Make a 5-Minute Call to the Permit Desk
A quick call can confirm everything and save rework. Have the following ready:
- Property address and parcel number if available
- Shed dimensions (length, width, total square footage) and overall height
- Foundation type (skids, blocks, piers, or slab)
- Planned utilities (none, electrical only, or plumbing)
- Proposed location and distances to property lines, house, and easements
- Zoning designation and any floodplain or septic details if applicable
- Any HOA or neighborhood restrictions you are aware of
Ask these questions to lock in your path:
- Do I need a building permit, zoning clearance, or both for this shed size and height?
- What are the required setbacks for an accessory structure in my zoning district?
- Which documents do you require at submittal, and in what format (PDF sizes, paper copies, or photos)?
- What are the current fees and when are they paid?
- How long does review typically take, and are over-the-counter approvals available?
- What inspections will be scheduled and at which stages?
Typical Timelines and Fees
Timelines vary by jurisdiction, but many sheds without utilities are approved over-the-counter or within 1 to 10 business days. Sheds with utilities, taller heights, or locations near easements may take longer if zoning or plan review is required. Fees often include an application fee plus plan review and inspection charges. Expect modest fees for small, non-habitable sheds, with higher costs when utilities or structural foundations are involved.
What to Confirm Before You Apply
- Size and height thresholds that trigger permits or additional review
- Setback distances and placement rules for your zoning district
- HOA approval requirements and any architectural guidelines
- Required submittals (site plan, basic drawings, photos) and file standards
- Current fee schedule, accepted payment methods, and inspection steps
- Processing timeline so you can schedule material delivery and build days
If you need product specs or a simple layout to support your application, we can help. At Best Barns, we provide clear dimensions and guidance so you can submit with confidence and build on schedule.
Permit Checklist: Size, Setbacks, Fees, and Required Documents
Use this action-focused checklist to confirm what your city needs before you build or order your shed. It keeps you compliant, saves time, and helps you plan with confidence.
Dimensions and Structure
Start by documenting the size and features of your shed. Many cities set permit thresholds by square footage, height, and whether utilities are included.
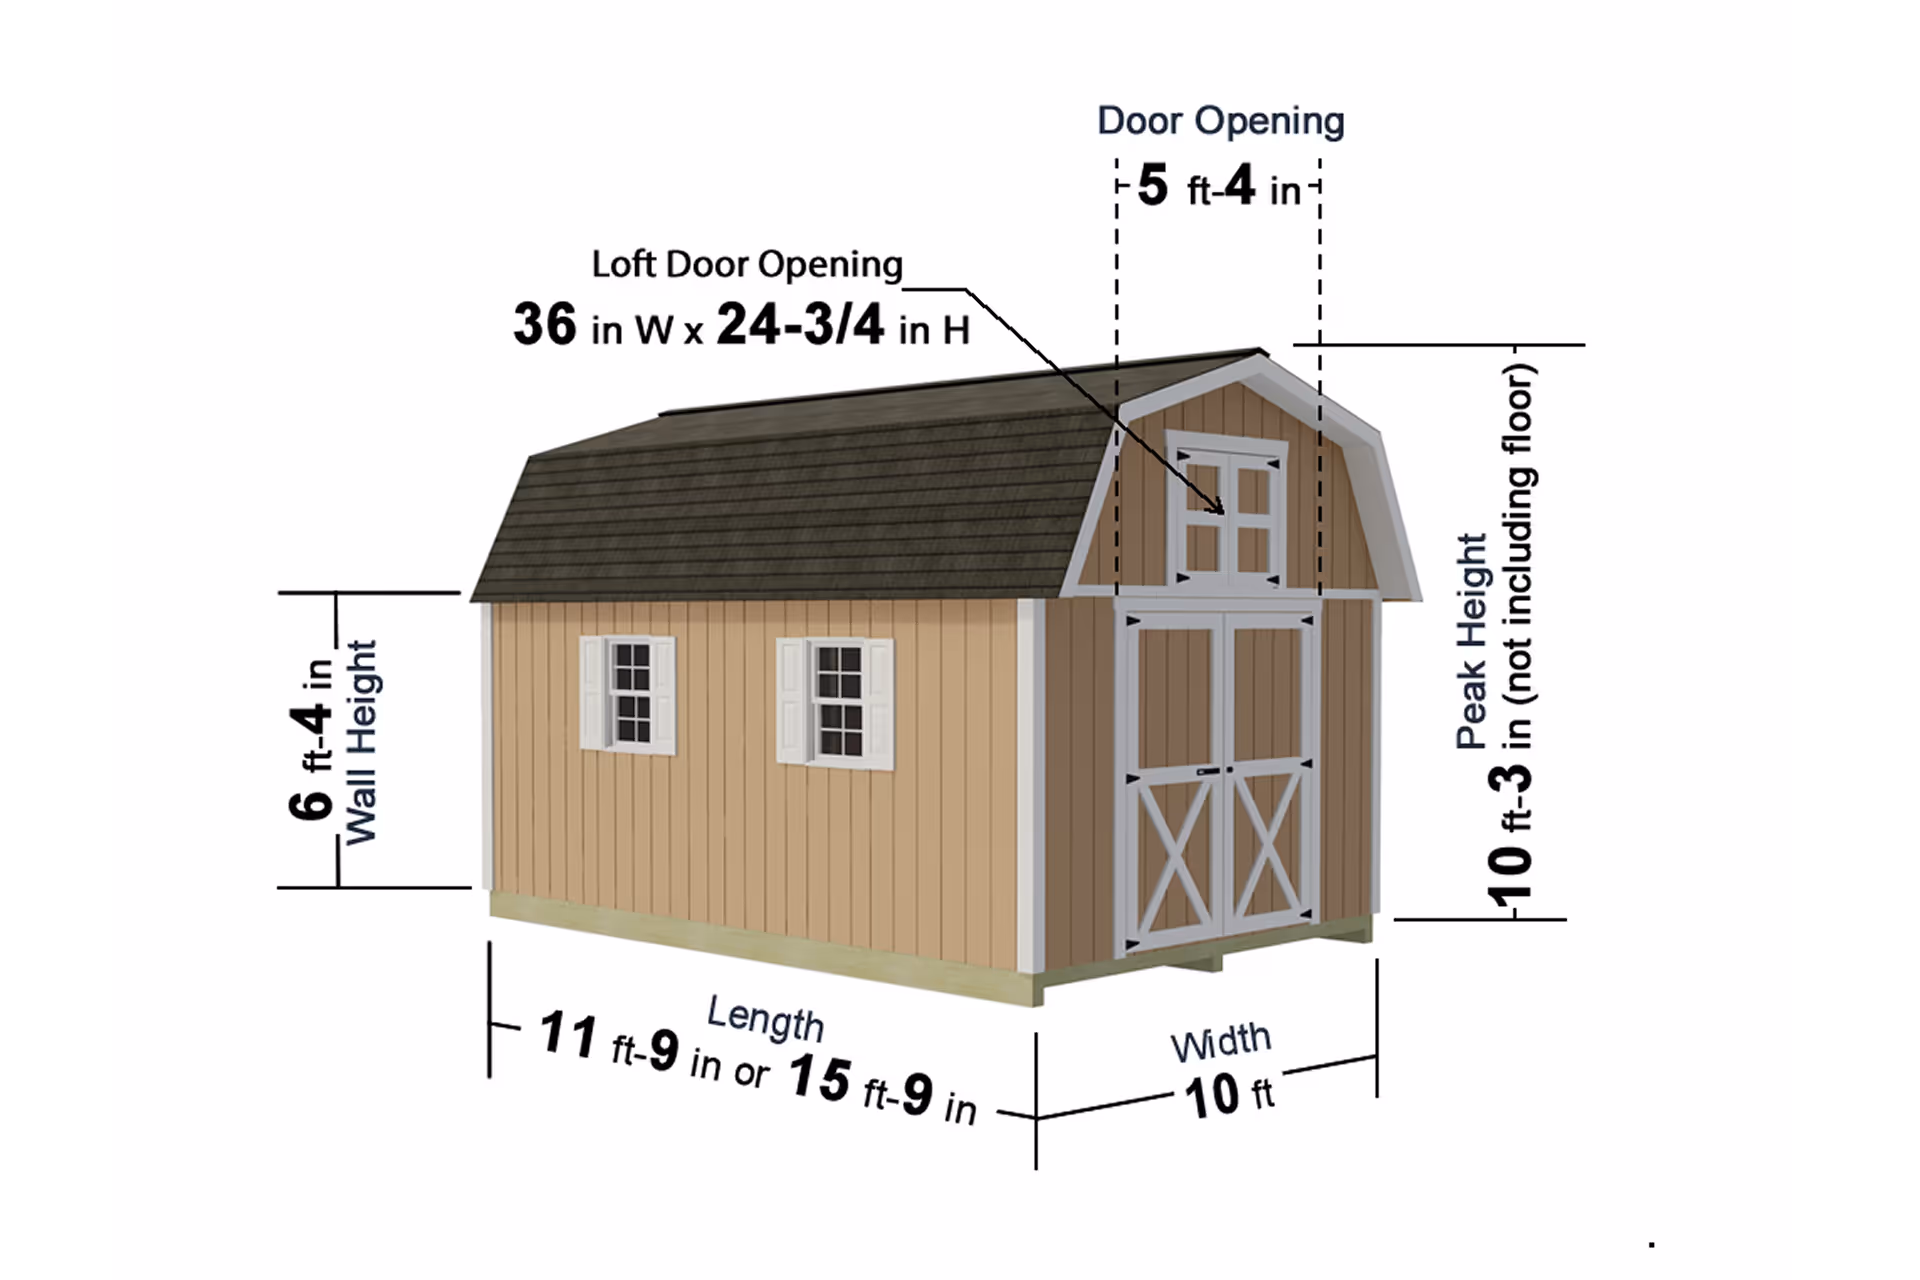
- Footprint: Note overall length × width (e.g., 10 × 12). Common triggers are 120–200 sq. ft. Confirm your city’s exact limit.
- Height: Record wall and peak height. Taller roofs or lofts can require permits even if the shed is small.
- Use and utilities: Electrical, plumbing, or HVAC typically require permits and inspections.
- Foundation/anchoring: Slab, piers, or tie-downs may be specified by code or wind/snow zones.
Location and Setbacks
Confirm where the shed can sit on your lot. Zoning setbacks and easements are common reasons applications are delayed.
- Property lines: Typical side/rear setbacks are 3–10 ft; street or corner lots can require more.
- Distance to house: Some codes require separation for fire safety (often 3–10 ft).
- Easements and utilities: Keep clear of drainage, sewer, and overhead lines.
- Overlays: Floodplain, coastal, or historic districts may add extra approvals.
Submittals, Fees, and Timelines
Gather simple, clear documents. Most small sheds can be reviewed quickly when your packet is complete.
- Site plan: Scaled sketch showing lot lines, existing buildings, shed location, and setbacks.
- Drawings/photos: Elevations, floor plan, door/window placement, and anchoring details. Include kit spec sheets when available.
- Application and fees: Expect a flat fee or valuation-based fee plus possible plan review. Keep your receipt.
- Timeline: Over-the-counter for very small sheds; 5–15 business days is common for plan review.
Compliance and Closeout
Finish strong by scheduling required inspections and keeping records for resale and insurance.
- Inspections: Foundation/anchoring and final are typical; add electrical if applicable.
- Penalties: Building without a permit can lead to stop-work orders, double fees, or relocation if set back rules are missed.
- Records: Save approved plans, inspection cards, and final sign-off.
At Best Barns, we make it simple to plan ahead. Use this checklist to verify requirements with your local building department and move forward with clarity.
Required Drawings, Photos, and Site Plans
What Your Site Plan Should Show
Create a simple, scaled site plan that outlines your lot, property lines, and the exact location of your proposed shed. Show distances to the house, fences, other accessory structures, and key items like driveways, sidewalks, wells, septic tanks/fields, and overhead or underground utilities. Clearly mark zoning setbacks and easements so reviewers can verify compliance at a glance.
Include the shed footprint with overall dimensions, the door orientation, and an access path for delivery or construction. Add a north arrow, scale (for example, 1" = 10'), your address, and the parcel number if available. You can sketch this on a printed parcel map from your city or county GIS, as long as measurements are accurate and legible.
Simple Drawings That Get Approved
Most departments accept straightforward drawings. Provide a floor plan showing the shed’s length and width, door and window locations, and foundation or anchoring method (skids, pier blocks, concrete slab, or anchored runners). Add an elevation drawing with wall height, total height to the ridge, roof pitch, exterior materials, and trim. If required, include a basic wall or roof section noting framing sizes and fastening details.
If you plan to run power, show the trench route, conduit size, breaker rating, and GFCI locations. If there are no utilities, state “no electrical/plumbing” on the drawing. Many jurisdictions also ask for design criteria (ground snow load, wind speed, exposure); list these on the sheet. We provide Best Barns spec sheets and typical drawings to help you complete this step quickly.
Photos That Support Your Application
Take clear daylight photos from the street and each property corner toward the proposed shed location. Include the house and nearby structures for context. Mark the shed corners on the ground with stakes or paint so reviewers can see size and placement. If landscaping or fencing will screen the shed, capture that, too. Label each photo with the view direction (for example, “Facing north from rear fence”) and the date.
For sloped sites, add a photo that shows grade changes. If an HOA review is needed, these same photos typically satisfy their design committee and help speed approval.
File Formats and Submission Tips
Save drawings and the site plan as a single PDF if possible; attach photos as JPG or embed them in the PDF for a clean package. Use clear filenames like “123-Main-St_Shed-Site-Plan.pdf.” Most cities accept letter or tabloid pages—choose a scale that keeps dimensions readable. Double-check that setbacks, total height, and anchoring details are easy to find.
Before you submit, verify submittal requirements on your city’s permit page or with a quick call, then include their checklist with your packet. We’re happy to provide product specifications, typical foundation details, and load data for your Best Barns kit so you can experience a smoother, faster review.
HOA Rules and Neighborhood Restrictions
Your neighborhood’s rules can affect shed size, placement, and style even when the city doesn’t require a permit. Review your Covenants, Conditions, and Restrictions (CC&Rs) and plan for HOA approval in parallel with your city process to keep your project on schedule.
Understand Your HOA’s Authority
Most associations enforce design standards through an Architectural Review Committee (ARC). Their guidelines often go beyond local code—requiring specific locations, materials, or colors. You must satisfy both sets of rules. City approval doesn’t override your HOA, and HOA approval doesn’t replace a city permit. Confirm who manages reviews (board, management company, or ARC) and how submittals are accepted (portal, email, or paper).
Typical Restrictions to Expect
Common HOA limits include maximum footprint (for example, 80–200 sq. ft.), height caps (often 8–12 ft), placement behind the rear building line, added setbacks from property lines and easements, screening from street or neighbors, and material/finish requirements to match your home. Many HOAs specify roof pitch and shingle type, restrict metal siding, and require neutral paint colors. Some prohibit utilities or require concealed conduit. If your plan includes windows, ramps, or double doors, note those details so the ARC can approve them upfront.
Documents Your ARC Wants
Prepare a concise package: the HOA application form, a dimensioned site sketch showing property lines, easements, and setbacks, photos of the yard from the house and the street, product cut sheets or a brochure for your shed kit, exterior color and roofing selections, and a simple elevation showing height. If you’ll add power or water, state it clearly. Expect review times of 10–30 business days and modest fees. At Best Barns, we can provide spec sheets and assembly drawings that make approvals faster.
Strategies for Quick Approval
Match your home’s siding tone and roof shingles, position the shed behind fencing or landscaping, and keep height within fence lines when possible. Show drainage away from neighbors, maintain clearances from utility easements, and avoid encroaching on setbacks. If guidelines allow options, choose the most compliant path—smaller footprint, lower ridge height, and subdued finishes typically earn faster yeses.
Conflicts, Penalties, and Records
When rules differ, the stricter standard applies. Building without ARC approval can trigger daily fines, required removal, or liens; building without a city permit can lead to stop‑work orders, double fees, or forced modifications. Verify in writing with your HOA manager and local building department before you buy materials. Keep the ARC approval letter, stamped site plan, and any permits or inspection cards—these documents support smooth resale, refinancing, and insurance claims.
Inspections, Penalties, and How to Avoid Permit Problems
Inspections for backyard sheds are straightforward when you plan ahead. Most jurisdictions require verification of location, height, and anchorage before you finish the build. Clarify which inspections apply to your shed when you pick up your permit so you can stage materials and schedule your work efficiently.
Common inspections to expect:
- Site and setback verification: stakes or string lines showing distances from property lines and other structures
- Foundation or anchorage: gravel pad, concrete piers, slab, skids, or ground anchors inspected before floor framing
- Framing or tie-down check: wall height, roof height, fasteners, and connections if your city requires it
- Final inspection: doors and windows installed, drainage maintained, and the shed matches the approved plan
How to schedule and pass the first time:
- Request inspections 24–48 hours in advance through your city portal or by phone; confirm cut-off times
- Keep your approved permit, site plan, and product drawings on site and accessible to the inspector
- Expose footings or anchors and provide clear access; have a tape measure and level ready
- Mark height and setback dimensions on stakes so they can be verified quickly
- Capture dated photos at each stage in case your city allows virtual or photo inspections
Penalties to avoid:
- Stop-work orders that pause your project until approvals are secured
- Fines or double permit fees for work started without a permit
- Correction notices requiring relocation if setbacks or easements are violated
- Removal of unpermitted structures that exceed height or encroach on utilities
The easiest way to stay compliant is to verify requirements up front, follow your approved documents, and document each step. We provide Best Barns kit drawings and anchoring guidance to support your permit, streamline inspections, and help you move from delivery to final approval with confidence.
Streamlining Your Shed Permit Application
Make your shed permit simple by submitting a complete, consistent package the first time. Start by confirming your shed’s purpose, size, height, location, foundation type, and any utilities. Keep the same measurements and notes across your application, site plan, and drawings—mismatches are the most common reason for delays.
Prep your documents so reviewers can move quickly. Organize a single folder with clear file names (123-Main-Shed-Site-Plan.pdf). Include your filled application form, scaled site plan with setbacks, labeled elevations with overall height, foundation detail, property photos, and your HOA approval if required. Combine multi-page PDFs and confirm everything is readable at 100% zoom.
Submit smart. If your city offers an online portal, use it—digital submittals often review faster and make communication easier. If not, book a counter appointment. A quick pre-application call can confirm fees, whether engineer-stamped details are needed for your soil, wind, or snow loads, and how many inspections to expect after approval.
Plan your timeline. Over-the-counter reviews for small, non-electric sheds may take 1–3 business days; projects needing zoning checks can run 1–2 weeks, and HOA reviews may add time. Budget for application, plan review, and record fees. Track your permit number, note your reviewer’s name, and respond to comments within 24 hours to keep momentum.
Reduce corrections by labeling a north arrow, scale, setbacks, lot coverage, and easements on your site plan. Show the trench route if adding power or clearly note “no utilities.” Attach Best Barns spec sheets with model, footprint, roof pitch, and design loads to help reviewers verify compliance quickly. With a clean submittal and proactive communication, you’ll experience a faster approval and start building with confidence—Crafting Your Vision, Building Your Barn.

.svg)


.avif)